
How to Close Your Pool for the Season: A Complete Step-by-Step Guide
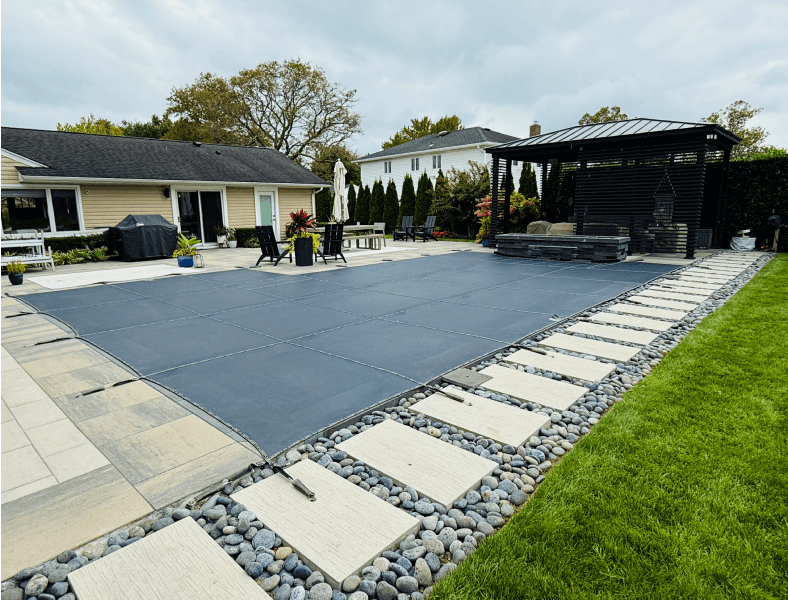
Closing a pool for winter is easier than most first-time owners think, but skipping the wrong step can cost hundreds in spring repairs. Studies have found that freeze damage to pool plumbing and equipment is one of the most common reasons for spring service calls (Pool & Spa News, 2025 Industry Survey). This guide walks you through everything from deep cleaning to covering the pool, designed for both above-ground and inground pools.
Key Takeaways
- Deep clean the pool and balance water chemistry before adding winterizing chemicals — dirty water breeds algae even in cold weather.
- Lower the water level below the skimmer opening, and blow out or drain all water from pumps, filters, and plumbing lines to prevent freeze damage.
- Use a winter cover seal or water bags to secure the cover — an unsecured cover lets in debris and sunlight, which fuel algae growth.
- An air pillow under the cover creates a dome that sheds snow and rain, preventing standing water and extending cover life.
- Label and store all drain plugs and winter accessories so they are easy to find when you reopen in spring.
Step 1: Deep Clean the Pool
According to the Association of Pool and Spa Professionals, proper cleaning before winterization reduces the risk of staining and algae by as much as 70% compared to closing a dirty pool. Start by skimming the surface for leaves and debris, then brush the walls and floor with a stiff brush. Vacuum the entire pool, paying extra attention to corners and steps where debris tends to settle. Remove all accessories such as ladders, handrails, diving boards, ropes, and floating dispensers. Rinse and store them in a dry location where they won't be exposed to freezing temperatures.
Clean the filter last. Whether you have a sand, cartridge, or DE filter, perform a thorough cleaning or backwash before you drain water. This prevents trapped organic matter from decomposing inside the filter over the winter. If you need replacement filter parts or a new system, explore our selection of pool filters and pump combos.
Step 2: Balance the Water Chemistry
Balanced water is essential. Even with winterizing chemicals, water that is out of balance can cause scale deposits, corrosion, or staining that becomes visible only when you open the pool in spring. Test and adjust:
- pH — target 7.4 to 7.6
- Total alkalinity — target 80 to 120 ppm
- Calcium hardness — target 200 to 400 ppm
Once balanced, add a winterizing chemical kit designed for your pool size. These kits contain algaecides and winterizing agents that keep the water clear through the cold months. The Pooltrol Winterizing Chemical Kit covers pools up to 35,000 gallons, while our full range of winterizing kits includes chlorine-free options and all-in-one solutions for smaller pools.

A properly covered pool stays clean and protected through winter.
Step 3: Lower the Water Level
Lower the water level to below the skimmer opening. For most inground pools, this means draining to about 4 to 6 inches below the skimmer mouth. For above-ground pools, follow the manufacturer's recommendation, typically 6 inches below the skimmer. This prevents freezing water from expanding inside the skimmer and cracking it. If you prefer not to lower the water level, a skimmer winter plate such as the Aquador can be installed to block water from entering the skimmer while keeping the pool full.
Step 4: Drain and Protect the Equipment
This is the step where most first-time owners make mistakes, and the consequences are expensive. Any water left in the pump, filter, heater, or plumbing lines can freeze, expand, and crack the equipment. Remove the drain plugs from the pump, filter, and heater and let all water drain out. Use a shop vac or a blower attachment to blow out the return lines and skimmer lines. For above-ground pools, disconnect the hoses and store them indoors.
Once drained, remove the drain plugs, clean them, and store them in a labeled bag taped to the equipment or the filter tank — this prevents the common spring scramble of finding where the plugs went. If you removed the pump for indoor storage, seal any open plumbing connections with threaded plugs to prevent pests or debris from entering the lines.
Step 5: Add Winterizing Accessories
Several inexpensive accessories make a meaningful difference in how well your pool weathers the winter. An air pillow placed on the water surface under the cover creates a dome shape that helps snow and rain slide off rather than pooling on top. This reduces stress on the cover and makes spring opening easier. Install the air pillow by inflating it to about 75% and tying it loosely to the cover or a cleat so it stays centered.
Skimmer guards or winter plates block debris from entering the skimmer and protect the skimmer from ice expansion. The Aquador AG Winter Plate is a simple snap-in solution that saves time during both close and open. Also add gizzmo or threaded winter plugs to the return lines to protect the fittings from ice damage.
Step 6: Cover the Pool
A quality winter cover is your pool's primary defense against debris, sunlight, and winter weather. Solid covers block sunlight completely, which prevents algae growth, while mesh covers allow water to drain through but still keep out leaves and debris. Both types are effective; the choice depends on your climate and how much spring cleanup you want.
Secure the cover tightly using a winter cover seal or cover bags filled with water. Loose covers can blow off in strong winds, exposing the pool to debris and sunlight. The Arctic Armor Above-Ground Pool Winter Cover offers a 15-year warranty for round above-ground pools, while the Unrippable Winter Pool Cover is rated 5x stronger than standard covers for inground pools. Browse all inground winter covers and above-ground covers to find the right fit for your pool.
Common Mistakes First-Timers Make
The most common mistake is forgetting to drain the pump and filter before storing them for winter, even after removing the drain plugs — residual water in low spots can freeze. Another is leaving the drain plugs in a drawer and forgetting which drawer, which is why labeling and taping them to the equipment matters. Many first-timers also add winterizing chemicals but skip testing the water balance first, which reduces the chemicals' effectiveness. Finally, an unsecured cover that blows off mid-winter lets in sunlight, debris, and rain — effectively undoing all the winterization work. A simple cover seal or water bag set solves this.
Essential Tools and Products Checklist
What You Will Need
- Winterizing chemical kit (choose by pool size)
- Air pillow (for above-ground and some inground pools)
- Winter cover (solid or mesh, sized to your pool)
- Winter cover seal or cover water bags
- Skimmer winter plate (Aquador or similar)
- Threaded winter plugs for return lines
- Shop vac or blower for blowing out lines
- Labeled bag for storing drain plugs
- Test kit for water chemistry
Frequently Asked Questions
Conclusion
Closing your pool for winter is a manageable process that protects your investment and makes spring opening much easier. The six core steps are: deep clean the pool, balance the water chemistry, lower the water level, drain all equipment, add winterizing accessories, and cover the pool securely. Avoid the common mistakes of skipping the water balance, forgetting to drain the equipment, and leaving the cover loose. For more seasonal pool care tips, read our guide on how pool sand filters work and how to winterize your pool. Stock up on everything you need from our winterizing kits and winter covers to ensure your pool is ready for the cold months ahead.
Recent Blogs
How to Close Your Pool for the Season: A Complete Step-by-Step Guide
Closing a pool for winter is easier than most first-time owners think, but skipping the wrong step...
How to Backwash a Pool Sand Filter: A Complete Step-by-Step Guide
If your pool water looks cloudy or the pressure gauge on your sand filter is climbing above normal,...
Are BWT Pool Cleaners Worth It? 2026 Review & Buyer's Guide
If you’ve been searching for a robotic pool cleaner, you’ve probably seen brands like Dolphin, Polar...